Instant Pot French Bread
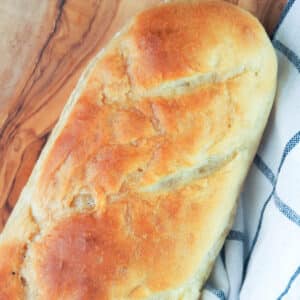
Instant Pot French Bread is very simple to make especially with the short time it takes to proof in the Instant Pot or Instant Dutch Oven. A delicious crusty soft loaf of bread adapted from Julia Childs, Mastering the Art of French Cooking, Volume II with just a few ingredients that is proofed and baked to perfection every single time.
- Time savings - this Instant Pot French Bread requires three rises or proofs to complete. Using the Instant Pot to do most of the proofing makes this 7-10 hour bread in easy reach in under 3 hours! My Anadama bread is also very quick!
- Delicious and easy - a tasty loaf of bread with a crusty exterior with minimal effort. This French bread is perfect to make when you're cooking up French Dip Sandwiches or Fettucine Alfredo.
- Make entertaining fun - impress your guests with a loaf of warm bread with a comforting bowl of cheesy French onion soup.
Ingredients you will need
Here is a quick snapshot of the ingredients you'll need. Scroll down to the recipe card where you'll find exact measurements.
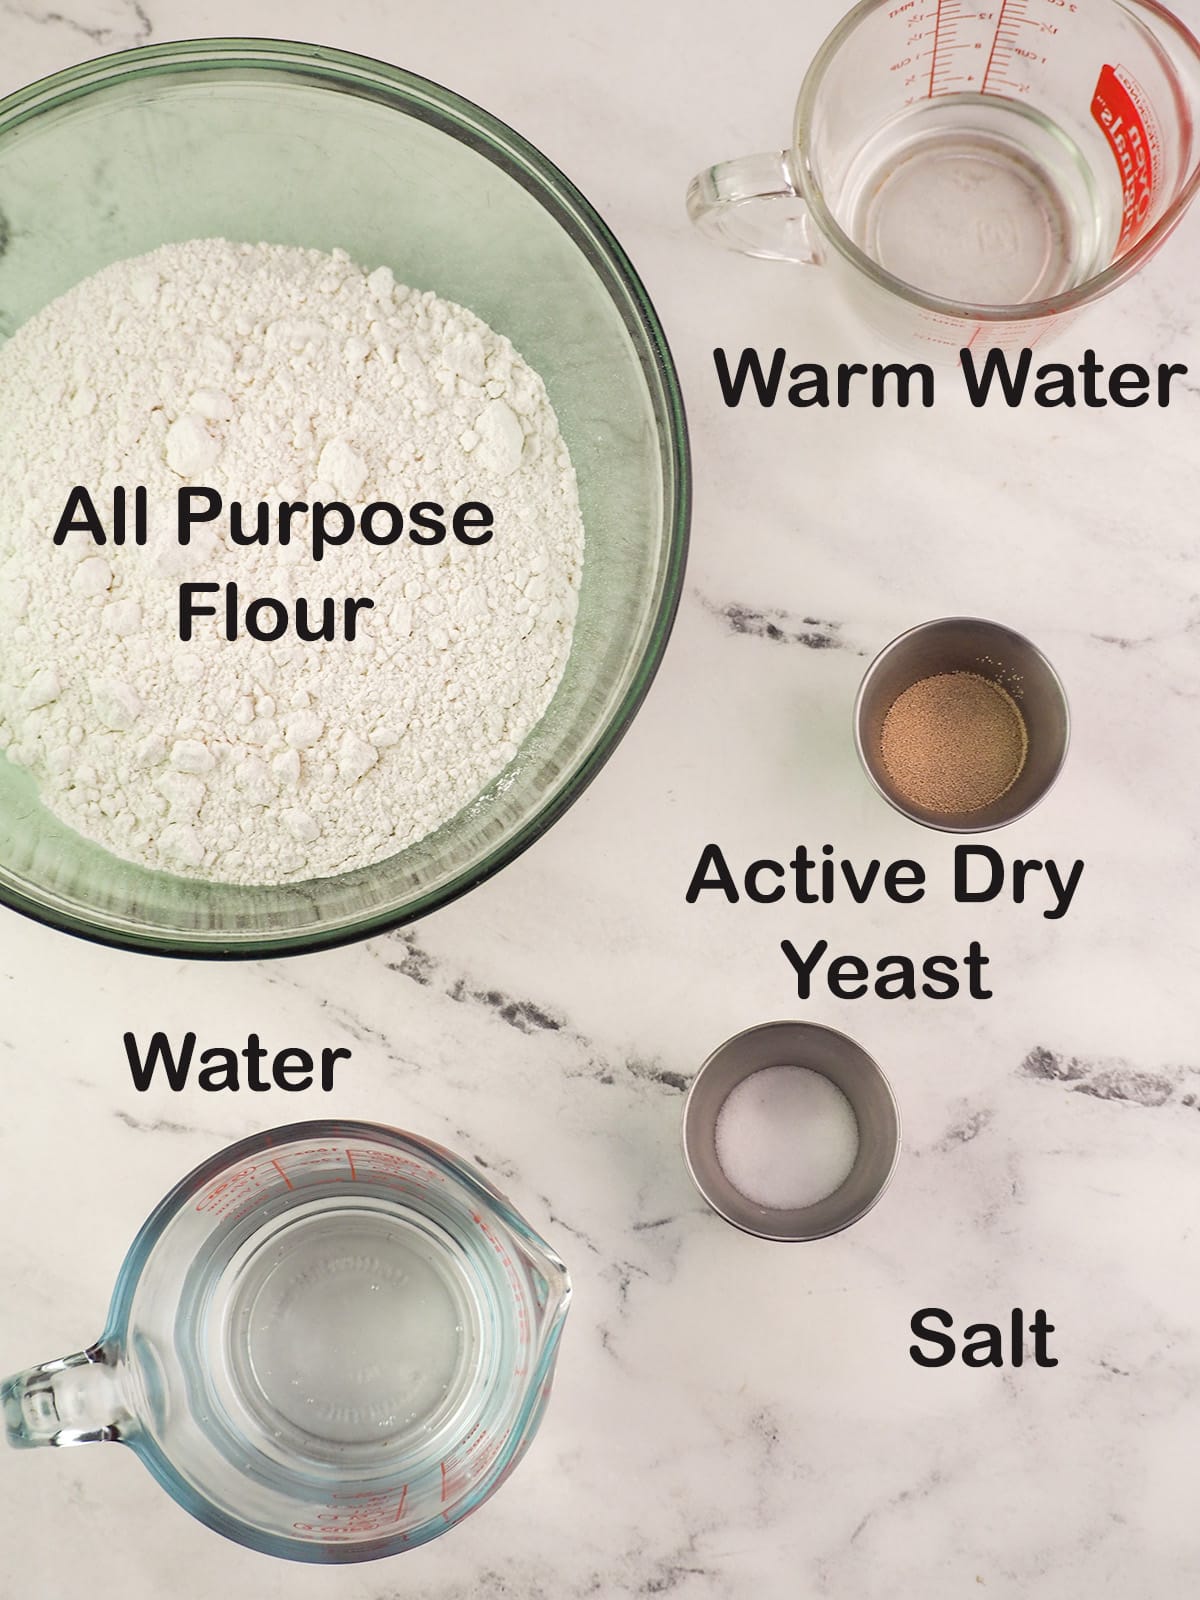
- Flour - no special flours here! This Instant Pot French Bread uses all-purpose flour.
- Active Dry Yeast - use one packet or 2 ¼ teaspoons if you have the bulk jar of yeast. You can use an equivalent amount of instant yeast.
- Warm water - the water should be warm enough to dissolve the yeast. Hot tap water will work for this. Be careful the water is not to hot as the yeast will not like it. Please do not microwave the water to get it warm as it can get away from you.
How to make this
Step 1: Making the bread dough
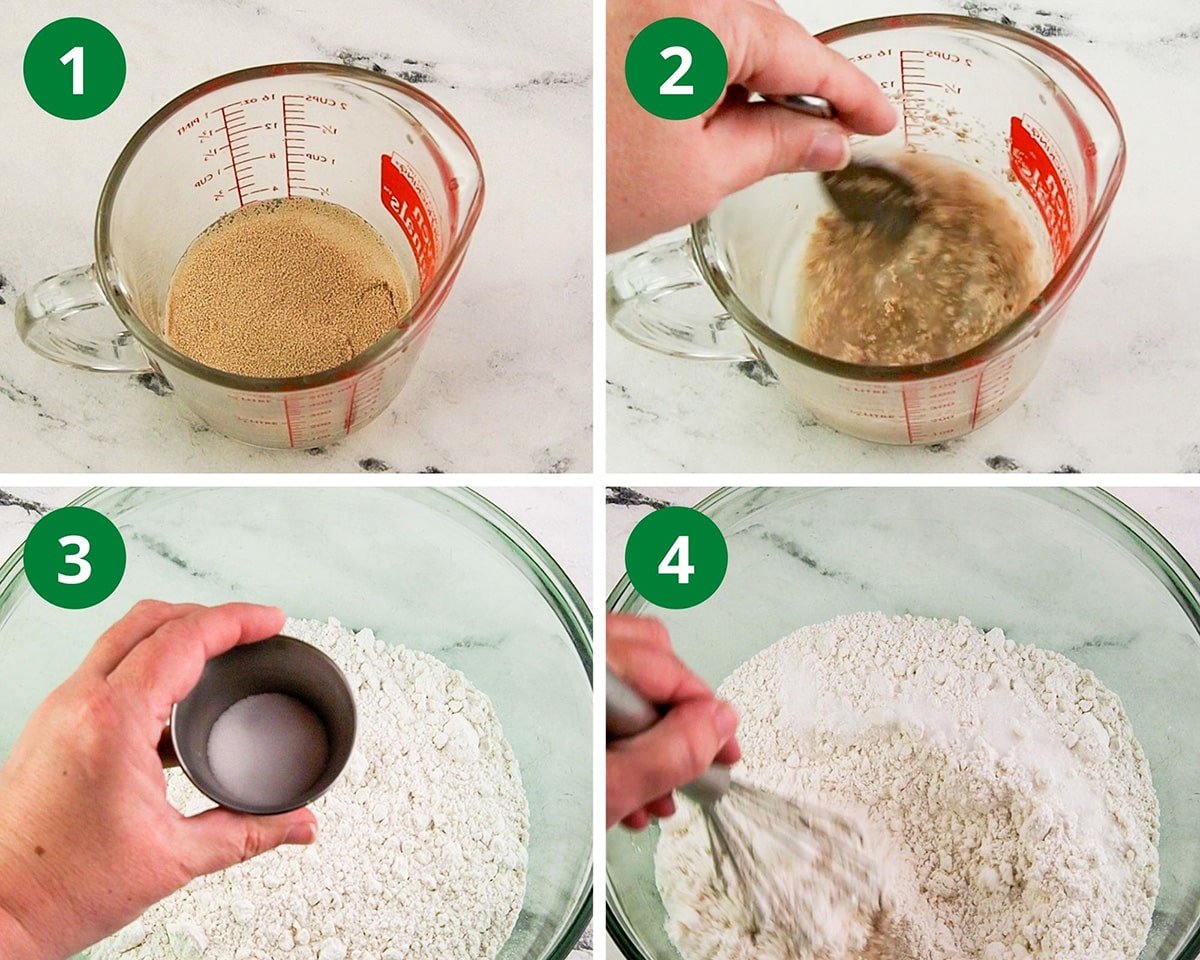
To start take ⅓ cup of warm water, which is just hot enough to dissolve the yeast that you are adding to the cup. This is warm water from the tap.
Be careful if the water is to hot the yeast won't like it, so be sure not to microwave the water.
Add in the yeast and stir until dissolved then set aside. If you use instant yeast instead skip this step, and whisk directly into the flour.
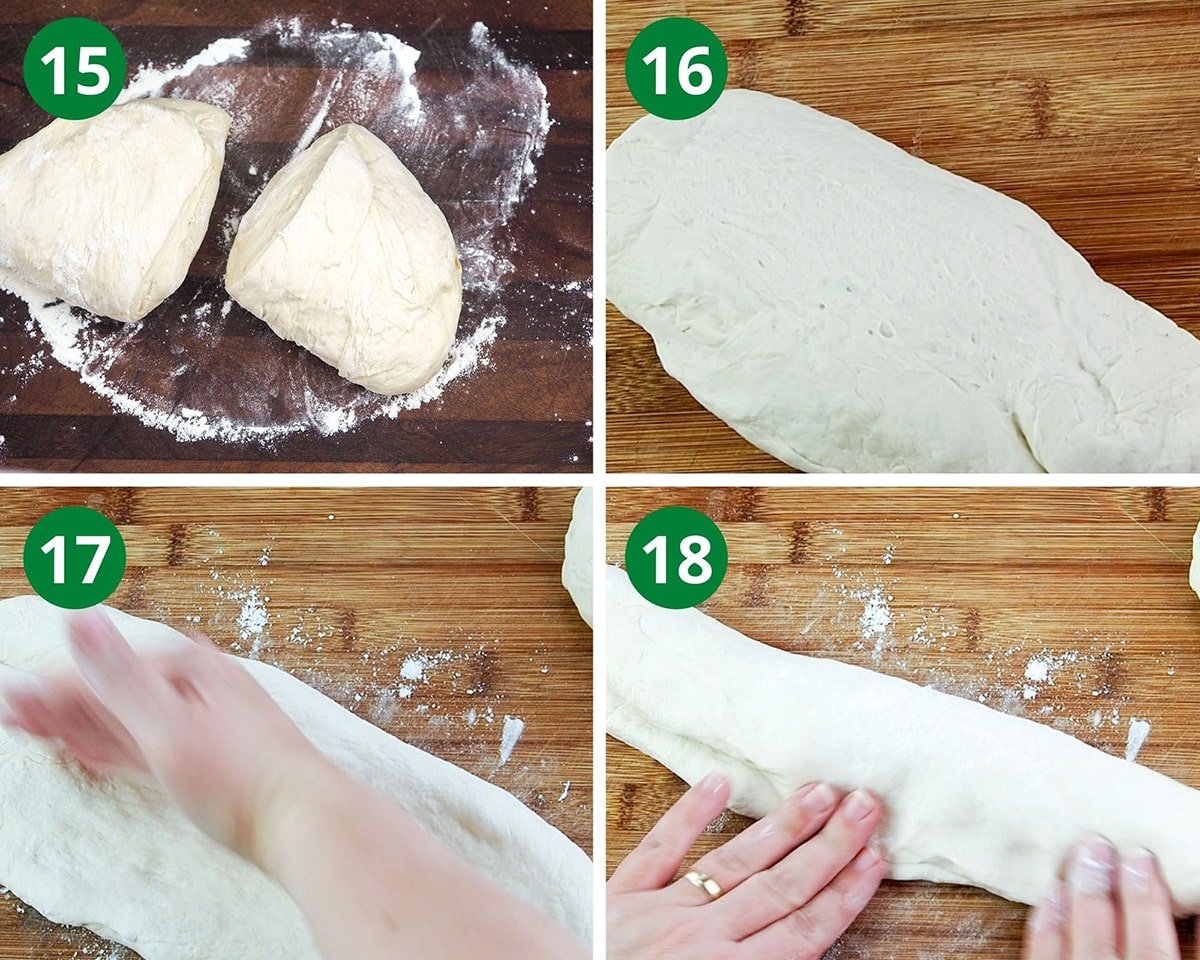
In a large mixing bowl whisk together the flour and salt.
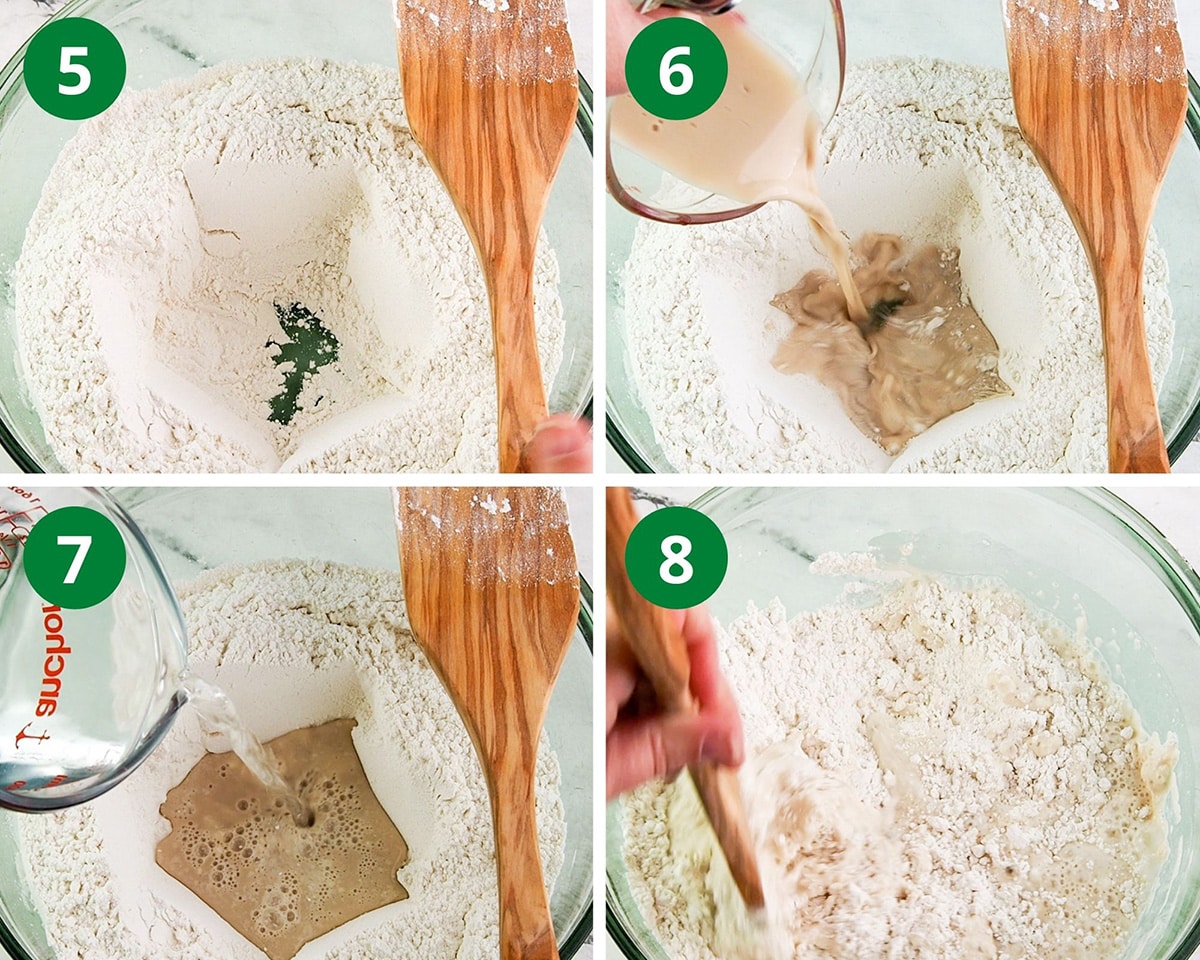
Make a well in the center, pour in the activated yeast water, and the remaining 1 1-4 cup of water. Stir with a spoon or spatula.
Step 2: Kneading and proofing the dough
The dough should look a bit shaggy, but all the flour should be well combined. Set aside for a few minutes to let the gluten rest prior to kneading.
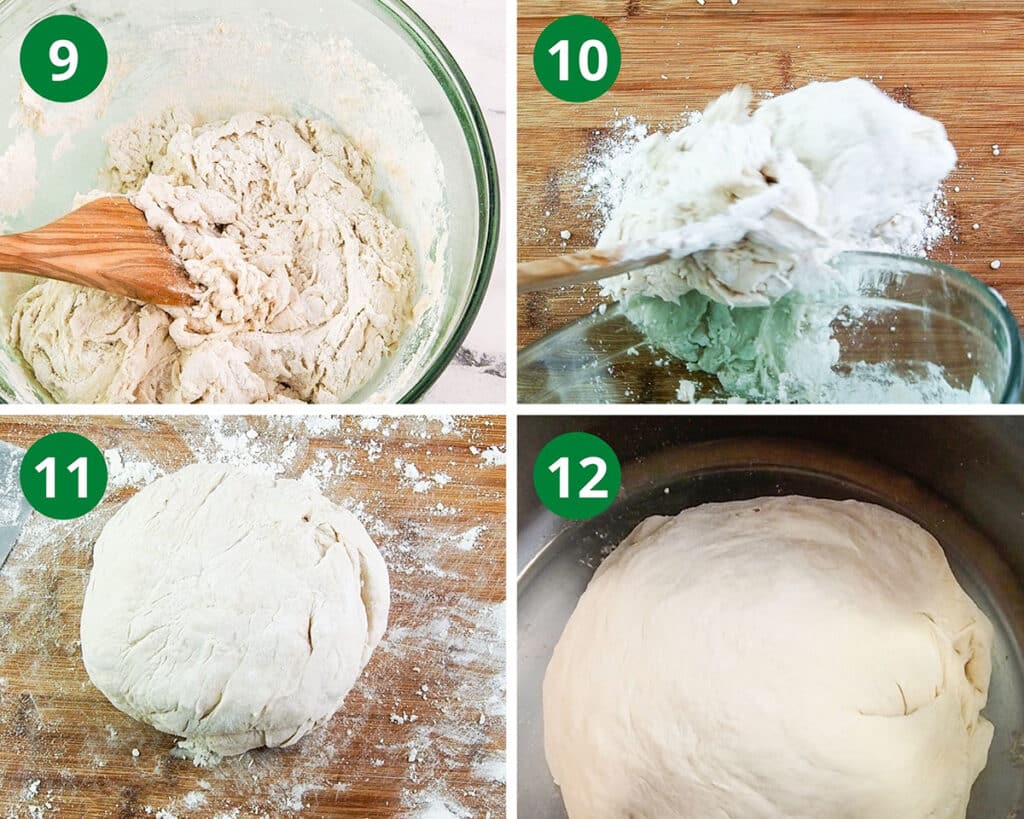
Turn the dough on the floured surface. If your dough seems to wet then now is the time to work in additional flour. You can use a pastry scraper to help turn or flip the dough ball.
Gently work the bread by continually taking one edge, folding over, flipping, and using the heel of your hand to work the dough to knead thoroughly. Work the dough, adding in flour as needed, until it is smooth and elastic. Form into a small ball.
This Instant Pot French Bread requires three rises or proofs, which is quick to do with the Instant Pot or the Instant Dutch Oven. You will need an Instant Pot that has a Yogurt button in order to do this, and a glass lid or plate to cover the top. The dough should roughly double in size each time it rises/proofs.
Lightly oil the inside of the Instant Pot with oil spray or olive oil. Place the dough ball inside. Cover with a glass lid, and set to the Yogurt function Low for 30-minutes. Do not use the Instant Pot lid to cover as it may get stuck if the dough rises to much.
If using your Instant Dutch Oven lightly oil it, and place the dough ball inside. Cover with the lid. Set to Manual Mode 1 at 85-degrees for one hour.
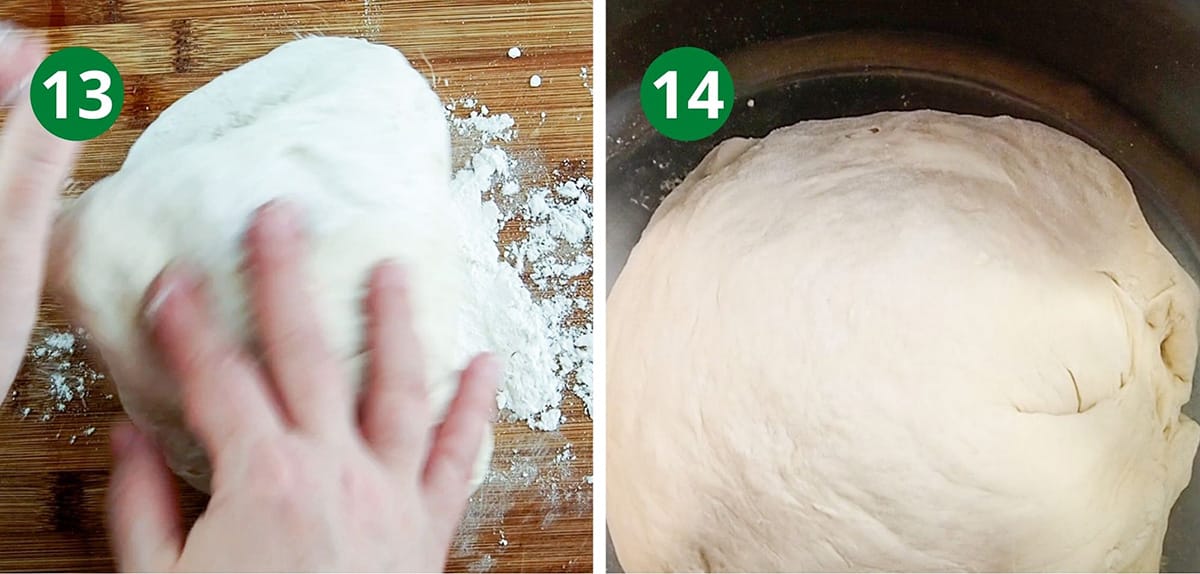
Once the timer beeps, turn the dough on onto a lightly floured surface. Knead again, and form into a ball of dough. Add the dough back tot he Instant Pot or Instant Dutch Oven to rise/proof again.
For the Instant Pot set to Yogurt function on Low for 30-minutes.
For the Instant Dutch Oven set to Manual Mode 1 at 85-degrees for one-hour.
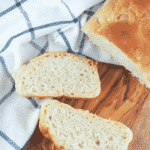
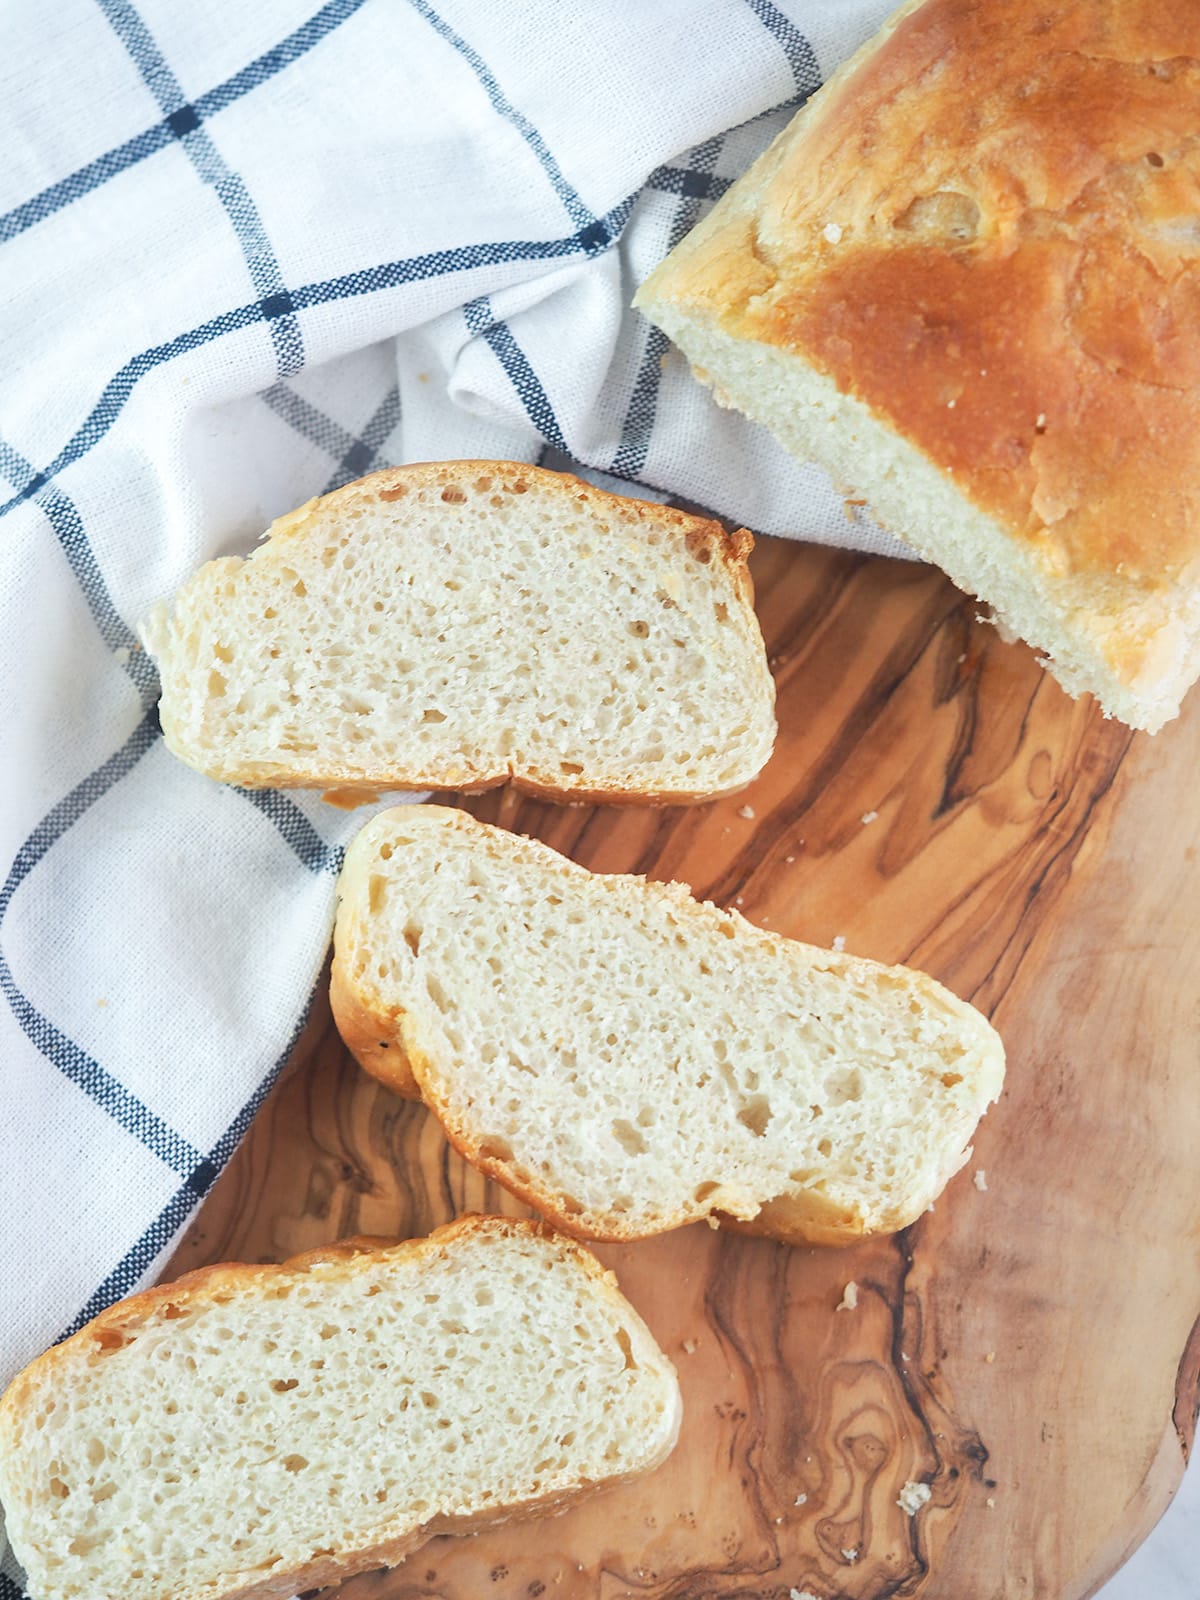
Time to prep the dough for it's final rise, which is NOT in the Instant Pot. You do have choices here...you can prepare a traditional baguette...OR...you can do them in your bread pans. This bread recipe is perfect for sandwiches, appetizers, or just for snacking.
Remove the dough from the Instant Pot or Instant Dutch Oven, and cut in half. Knead each half into a loaf. Press the loaf flat, and make an indentation in the middle from one long end to the other. Turn the loaf seam side down.
Place a towel or parchment paper on your baking sheet, cover lightly with a towel, and let rise for one hour. I generally will put it in a cold oven to allow the dough to rise its final time.
Step 3: Prep the bread for baking and baking the loaves
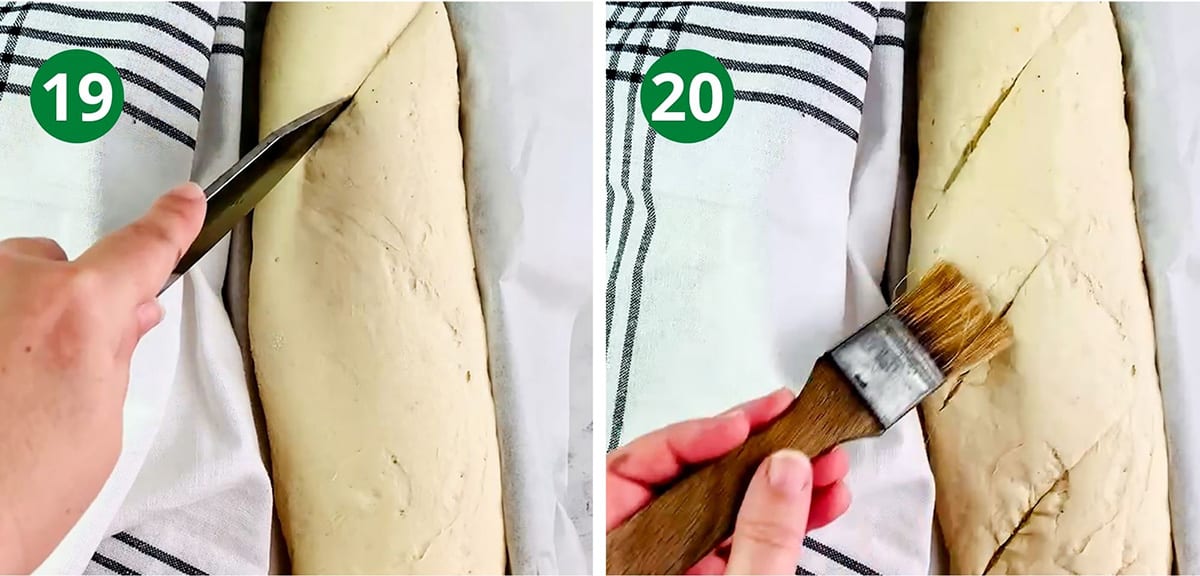
Once the dough has risen the final time, remove the towel, and make slits with a knife in the bread. Brush with plain water.
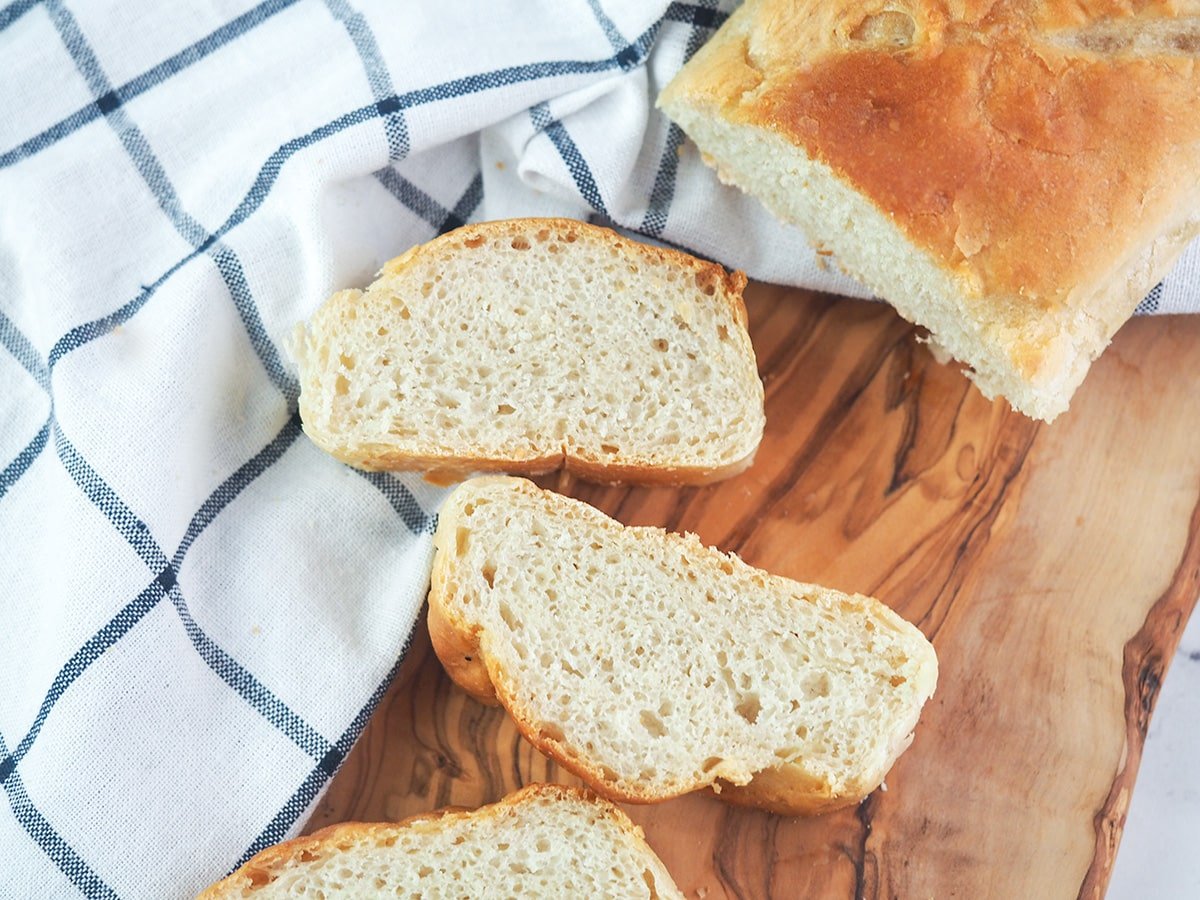
Preheat your oven to 450-degrees. Take a small knife and make three long slits in the top of the dough. Brush the top of the dough with a little water. Bake your Instant Pot French Bread in the oven is 25-minutes. Once done baking brush the bread with melted butter.
Expert tips
Always be sure to check the date on your yeast to make sure it is still good. The best place to store yeast to make sure it lasts longer is in the freezer. After opening be sure to store in the refrigerator.
If the dough is to wet it may have issues rising, so be sure to work in enough flour during the initial kneading to avoid this. You can knead this dough by hand or with the dough hook on your mixer.
Also, if you're house is very cold or your dough didn't double as expected then you can continue to proof without kneading. Do this an additional 30-minutes in the Instant Pot or one-hour in the Instant Dutch oven to increase the size of the dough.
FAQs
A baguette! These are long slender loaves of bread known for their crusty exterior and soft inside texture.
Yes, this bread is perfect for French toast in the mornings.
About two minutes.
Serving suggestions
This Instant Pot French Bread is perfect served alone warm with a pat of butter. You can also serve this with shrimp scampi, beef stew, or with some beef tips and gravy.
Storage & Reheating
Store the leftover bread in an airtight container, plastic wrap, or a plastic bag for up to three days. If you wish the leftovers can be toasted, or warmed in the oven at 200-degrees for a few minutes.
This can be frozen in a plastic bag for up to one month, and thawed on the counter top for use.
How to video
More delicious recipes


Did you try this recipe? Why not leave a star rating and/or a review in the comment section below to tell us about it! I always love hearing your feedback. Be sure to sign up for our email list, or follow us on Pinterest, Facebook, or Instagram!
Recipe
Instant Pot French Bread

Ingredients
- 1 pkg active dry yeast or if you have a jar, 2 ¼ teaspoons
- ⅓ cup warm water
- 3 ½ cups all-purpose flour
- 2 ¼ teaspoon salt
- 1 ¼ cups water lukewarm
Instructions
- Stir the yeast into the warm water until it dissolves.
- Add the flour to a large bowl, and whisk in the salt. Add the yeast mixture, and remaining water to the flour. Stir to combine.
- Flip dough out to a lightly floured surface and let rest for a few minutes.
- Knead the dough until it becomes elastic, and retracts it shape when pulled out. Depending on your experience this could take just a few minutes or a little longer. Roll into a ball.
- Oil the inside of your Instant Pot with olive oil, and set the dough ball inside. Cover the pressure cooker with a plate or lid. DO NOT USE THE PRESSURE COOKER LID. If you use the pressure cooker lid, it may become permanently stuck on.
- Press the yogurt button, and set for 30 minutes on the normal setting. Once complete, remove the dough, and knead for a few minutes to punch down. Return to the Instant Pot to rise on the yogurt setting for another 30 minutes.
- For the Instant Dutch Oven set to 85-degrees on manual mode 1 for one-hour.
- Once done, knead the dough one more time. Follow with another rising/proofing in the Instant Pot or Instant Dutch Oven.
- For the third rise, knead the dough and form into loaves. Cover with a clean towel, and place in a cold oven for one hour.
- Once done make a few slashes in the top of the loaves with a small sharp knife. Brush the top of the loaves with water. Bake for about 25 minutes in a preheated 450-degree oven. Once done remove, and brush with butter.
- Serve immediately, or store in an airtight container or bag for a few days. This can also be frozen for up to one month.
Video
Notes
Don't forget to join our Facebook Group for Instant Pot and Air Fryer recipes!


This bread looks so so good. If using a mixer, do you use it for each of the 3 proofing..about 2 mins each time? Thank you for sharing this awesome recipe,
You definitely can, but I usually do it by hand if using the mixer for the last two since it takes far less time to do. 🙂
I was wondering if baking one large loaf would work.
I have not tested that. If you do it will take longer to cook and you may need to cover with foil once the crust is browned to prevent burning.
Is it possible to double the recipe? My family devoured it too quickly and I’d love to bake once a week.
I haven't tested it, but I think it would be fine. There is usually enough room left in my 6-quart that a double batch would fit.
Can this recipe be used to make sub style buns? How long would you bake them? Thx!!
Sure they can be used to make small loaves. I would bake them at the same temperature but maybe not quite as long perhaps 15-20 mintues.
Should I take loaves out when preheat oven? You suggest letting rise in cold oven, then next directions say to preheat oven. Thanks for clarifying.
Yes, you will definitely want to remove the loaves after the final rising to preheat the oven. Once the oven is preheated then put the loaves back in to cook.
I’m not sure what happened on the final rise but I ended up baking two big crackers. I followed the recipe and it rose well in the InstantPot. Maybe the recipe is missing something?
There are a few things that might have happened. Did you do the final third rise in the oven? The yeast may have been old, or the water that it was dissolved in to hot. Also, sometimes if the dough is to wet where it may have needed additional flour worked into it given local weather conditions may have also had an effect. We are in our warm, humid part of the year here in Central Florida and I have had to work additional flour into the dough on occasion for this reason. Hopefully, these tips will help! 🙂